Blog

DDS Diver Grace doing a CCR Trimix Dive in Bon Echo Park

When Should You Get a Rebreather

When Should You Get a Rebreather
by
Matthew Mandziuk

Lately people have been asking us about rebreathers and when they should consider going that direction…So I figured “When Should You Get a Rebreather” would be a fun topic to write about.

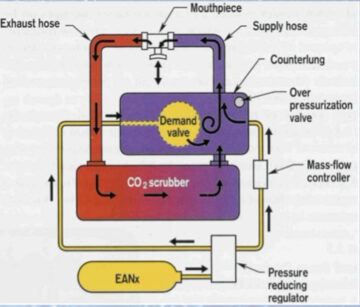
Rebreathers are a simple concept.  A rebreather is in essence like breathing from a “sealed bag” is filled with a breathable gas mixture.  As you breath each breath, you deplete the oxygen in the “bag” through the process of metabolizing the oxygen and putting back in the lung exhaled breath with a lesser partial pressure of oxygen until the “sealed bag” or “lung” would go hypoxic (think of breathing in and out of a paper bag as a concept), meaning not enough oxygen is in the gas you’re breathing to sustain life.

You would have to replace the depleted oxygen with more oxygen, but in addition to this, you’ll also have make sure that carbon dioxide is also being absorbed/eliminated from your rebreathed gas, so we need to “scrub” the CO2 out with a CO2 “scrubber”….Sound simple?  It is overall.

Below we will discuss who should dive a rebreather, the different basic designs and features, key elements, dive planning and more.

There are 2 main rebreather concepts.  Semi-Closed and Fully Closed rebreathers.

fathom rebreather rigged up as the tech version with faber LP50 tanks, Lola valves, atomic regulators, custom black camo halcyon evolve jj wing with maroon center, spg on left hip with diluent injection through the left hip d-ring
Fathom MK2.5 CCR Tech Rigged

Semi-Closed is less popular for the vast majority because it’s a glorified gas extender with an efficiency ranging from 4:1, 8:1, and as high as 10:1 efficiency depending on the gas supply.  They can use the same lung that a life-support patient breaths from which passively allows excess gas to vent from the bottom of the unit while the lung is refilled.

The Passive Semi-Closed Rebreather is very popular for depths where open and closed circuit scuba are less reliable.  PSCR Divers often use larger cylinders.

Fully Closed Rebreathers utilize smaller tanks, a greater degree of efficiency as high as 40:1 that of open circuit because when the efficiency is met, the diver recycles the entire exhaled breath and only has to inject the oxygen when the PO2 drops.  They can be more complicated but are more popular at the time of this writing

Rebreathers ARE NOT For Everyone

With the Cost of Helium increasing, more and more people are looking to breath more efficiently, however, diving a rebreather requires a higher level of awareness, technique, buoyancy, trim, knowledge of the machine and what can go wrong and how to troubleshoot problems.

It’s only a matter of time until Rebreathers become more common practice to the masses, however, now is not the time for most people because they don’t have the training or the experience.

Helium keeps going up and up, but that doesn’t mean unqualified Divers should be jumping in blind and bypassing all the experience and fun that is had learning and logging the experience dives that makes a person a better Diver.

Here are illustrations of a basic rebreather design and semi-closed rebreather design courtesy of the NAUI Rebreather Instructor Guide.

SCR Rebreather
SCR Rebreather
Closed Circuit Rebreather Diagram
CCR

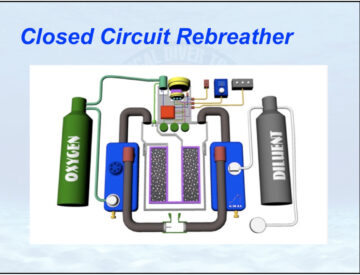
Types of Closed Circuit Rebreathers

Choosing the right rebreather for the individual is key.  There is no perfect one rebreather of everybody.

Automatic: Some Divers prefer an automatic rebreather than much like a dive computer, runs the dive for them setting a constant PO2 (oxygen set point) for them on descent and maximum depth injecting oxygen using a solenoid .

Unless the Diver remembers to set the computer to a lower set point on ascent, this can cause problems for the Diver as the unit will continue to inject oxygen as the depth reduces because as the diver goes shallower, the Po2 will drop, so if the Diver ascends from depth at a PO2 set point of 1.2ata the rebreather will try to keep filling the lung with oxygen, whereas, the diver needs to set their set point lower to 0.6ata and they can ascend without worrying about an out of control ascent and manually adjust their set point to their desired level.

Continuous Mass Flow and Needle Valves: Some rebreathers use what’s called a needle valve which uses a “Mass Flow” orifice on the regulator of the O2 tank. The Diver can set their oxygen set point based on their metabolic oxygen rate by adjusting the Needle Valve.

The needle valve will gently flow oxygen into the counterlung so if the diver becomes task loaded and isn’t watching their Po2 (which should never happen), they needle valve will prevent the Diver from going Hypoxic.

You’ll find the Mass Flow a great option which is why the original KISS Rebreathers are still one of the simplest designs, while the updated Needle Valve design of Fathom CCR  is becoming so popular.

The Continuous Mass Flow system is limited by depth.  The intermediate pressure of the regulator first stage can reach the same as ambient pressure meaning an intermediate pressure in the first stage of 10BAR/145psi will not put out any more gas past 81msw/260fsw.

The Fathom System corrects the by modifying a diaphragm sealed first stage with a stronger spring which allows for safe boosting of the intermediate pressure up to as high as 205psi/14BAR which is capable of diving to depths of 120msw/395fsw.  The pressure can also be increased up to 290psi/20bar for up to 585fsw or 177msw!!!

Excerp from the Fathom Page: “Smaller fixed-orifices can also be used for deeper depths with higher intermediate pressures but the risk of a blockage is increased and the options are limited by orifice availability. A fixed-orifice requires that the first stage intermediate pressure be adjusted to achieve a flow rate that corresponds to the diver’s metabolic needs, typically around 0.6 to 0.8 L/min. Conversely, the needle valve allows the first-stage intermediate pressure to be set to any pressure since the needle valve handles the flow adjustments. More importantly, the needle valve minimizes the risk of a blockage from debris since it can be opened up to allow small particles to pass. The oxygen MAV, which contains the needle-valve, is ported directly into the exhaust side of the head so oxygen must travel through the scrubber and mix with loop gas before reaching the diver.

1 (145 psi/14.7 psi/ata – 2 ata) x 33 fsw/ata = 260 fsw  (Note: always subtract 2 ata when calculating the maximum operational depth of a CMF system.)”

Diving the Bell Island Mine with Explorer and Rebreather Instructor Matt Mandziuk

Manual CCR: Manual Rebreathers are simple, easy to use, but require more attention to the instrumentation and require the operator to constantly inject oxygen based on their needs depressing an oxygen injection button allowing the Diver to adjust the oxygen as slowly or quickly as needed, in a similar fashion to how a diver would inflate their bcd.

When Diving a Manual CCR, the Diver will have to remember to monitor their Po2 and maintain the desired set point.

One of the more fun skills is “Volume Drop” which the CCR Diver will do in their initial training course to see how long it can take their mix to go near hypoxic from their targeted set point.

Keeping a consistent set point that mirrors a backup computer if there isn’t a second computer handset or NERD on the unit is a desired option.

Being diligent with keeping the oxygen level consistent is a must.

Simplicity and Reliability Should Favour Bells and Whistles

The more high tech of a rebreather, the more complacent some Divers get.  Whether you’re flying an automatic or manual system you should always be aware of your set point and Do Your Pre-Dive Checklist!

A Rebreather is a very Serious Piece of Equipment.

PSCR Rebreather
Semi Closed Rebreather Rigged and Ready to Dive with double 80’s in Mexico

A rebreather is essentially a nitrox or trimix gas mixing system that is designed to deliver a constant oxygen set point that acts as a gas extender to you diving more efficient.

With each exhaled breath you make on open circuit scuba, there is no way to get that exhaled gas back.

A rebreather recycles your exhaled air, which is typically 5-6% less oxygen than you inhaled.

When you exhale into a rebreather, you’re exhaling into a scrubber canister, which is essentially a “filter cartridge” that is filled with a carbon dioxide absorbent, a granual that traps the CO2 on granules that resemble kitty litter called Soda lime, which is used to remove CO2 from breathing gases to prevent CO2 retention and CO2 Poisoning.

The filtered gas enters a counterlung that allows you re-breath this recycled gas and as it continues to be re-breathed, oxygen has to be added on occasion to prevent hypoxia (not enough oxygen)….Some have said that a rebreather is “essentially slowly trying to kill you, so maintaining the oxygen levels is essential.”

With each breath in we drop our oxygen PO2 so as the levels drop, we need to add oxygen to “bump” up the levels or the oxygen percentage you’re breathing can go hypoxic meaning you don’t have enough oxygen to sustain life and can go unconscious and die.

White Arrow Axial Rebreather Scrubber Canister
White Arrow Axial Rebreather Scrubber
fathom rebreather scrubber regular and large size canisters
Fathom Radial Rebreather Scrubber by Golem Gear

Think of the Scrubber and counterlung as your cardiovascular system.

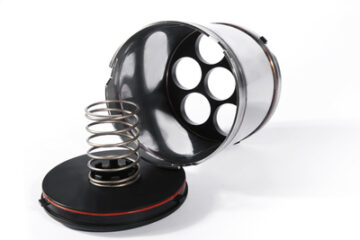
Radial vs Axial Scrubber

Radial Scrubber allows the gas to pass through he canister body and provides a lower work of breathing, but is more difficult to pack than Axial Scrubber canister.

As the Co2 Absorbent becomes wet through moisture/condensation, the absorbent can clump, which can make it more difficult for the gas to pass through it, thus increasing the work of breathing.

Axial scrubber size/length needs to be long enough to prevent channelling of gas and short enough to keep the work of breathing low enough.  A longer Axial scrubber will increase work of breathing.

For longer dives, a longer radial canister is much preferred as the work of breathing remains excellent on most designs.

There are also pre-packed scrubber cartridges available for some models of rebreather for the Diver who doesn’t want the responsibility or liability of packing a scrubber canister.  These are more costly, but effective.

Rebreather Fatalities are (approximately) 10 Times More Common than Open Circuit Scuba Fatalities

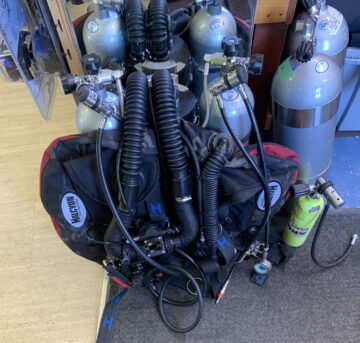
Diving a Rebreather is very different than diving traditional Scuba. You can’t control buoyancy the same way and they don’t deliver gas the same way. Some even have a very complicated bunch of electronics or bulky, dangling bits everywhere and a huge, bulky counterlung.

Many CCR Divers can’t do a “try dive” on the unit they think they want to buy, so unfortunately, we see many people making Very Poor Choices in their Selection.

Your best rebreather is ultimately the one you think you want, but honestly, the simplest, most reliable and mores streamlined rebreather is the one for you.

Avoid Bells and Whistle’s, and run the unit in “manual” mode instead of an automatic rebreather. Be In Control of Your Oxygen Levels, don’t trust the machine to do it all for you.

Get as polished as you can be and as experienced as you can be before you jump into a rebreather.

Who Should Dive a Rebreather?

If the CCR Diver is wanting to dive the a pair of shipwrecks within recreational limits and dump their scrubber after the dives are completed, the cost of absorbent and gas fills will cost more than Nitrox fill in doubles would, so unless that Diver is planning a longer than “No Stop” recreational time limits, or saving the absorbent after the days diving wraps up for another day of diving, there is no benefit to using a rebreather on those dives, other than practice.

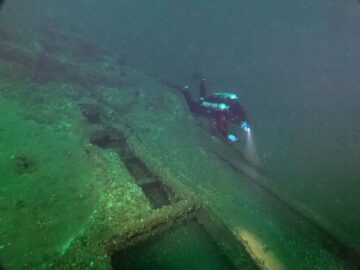
Cave Divers can spend hours underwater just on a single dive, as can shipwreck divers, technical divers and research divers.  This is who a rebreather is best suited for.

NEVER ABANDON HOGARTHIAN/DIR/NTEC PRINCIPLES AND VALUES

Your rebreather configuration should be as streamlined as your doubles setup. Simple, Streamlined, Reliable, Familiar. Long hose is always off the right post, necklace (or BOV)  is always off the left post so they don’t roll closed when swimming through a restriction like a cave or shipwreck.

Most CCR Divers Don’t Mirror Open Circuit (Long Hose, Backmounted Diluent, SPG Left Hip, etc.), which makes the system more complicated and in a situation where task loading can become a problem, that’s never good.

200′ Trimix Dive with LP50’s, argon, Nitrox 50 and Oxygen

You should NEVER have to re-orient your stage bottle rigging (Always Valves Up Not Valves Down), positioning of your stages (Always Left Side). Running your valves “Valves Down” means your regulators are going to hit first when you do a stage drop.  Those diving in the Great Lakes also have to worry about Zebra Muscles slicing into your hoses.  It’s also easier to do a bubble check when your stage bottle valves are facing you.

Valves Up? or Valves Down on the Main Cylinders?  Diving 3L Cylinders you will trim out better with the valves upright like a standard K Valve, but the Valves Down is acceptable for some configurations too.

When Diving CCR with Aluminum 40’s or Faber LP50’s Valves Up is the Most Modern and Most Reasonable Option.

Diving PSCR Valves Up is the Only Option as well, since the cylinders are larger and your’re mirroring your Open Circuit Doubles Configuration.

You can also get a Sidemount Rebreather in PSCR or CCR.  Many of them do not breath well.

Remember the DIR…NTEC Principles are based around the concept of “Doing it Right”.

Another Type of rebreather….Chest Mount

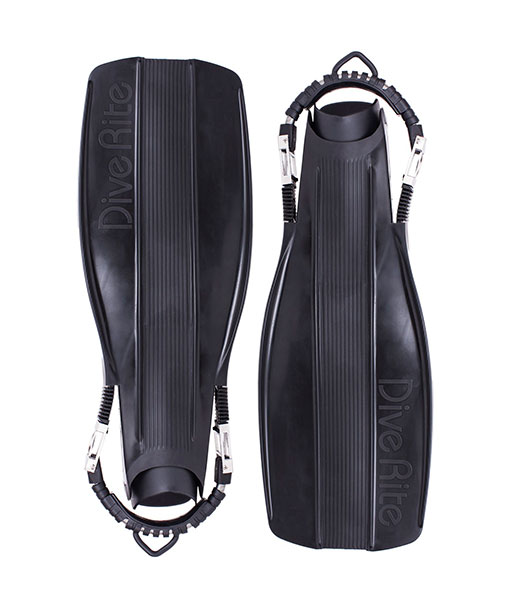
Rebreathers like the Dive Rite O2ptima CM and Sub-Gravity FX CCR are chest mounted rebreathers that allow the diver to keep their original back or side mount configuration.

The units sit on the front of the body and have been used by the military and White Arrow Divers for decades as a decompression rebreather, but are improving in popularity for their attractive price tag, work of breathing and travel friendly size.

Not Enough Bailout Gas

One of the most common problems with rebreather divers is that they do not carry enough bailout gas!

You’ll sometimes see a cave or trimix diver doing a technical dive with 1-2 aluminum 40 cylinders.  In the unlikely event the diver is equipped with 3L (FX23 cubic foot) tanks, they should have a minimum of 2 stages.

Some Divers are also starting to use a Sidemount Rebreather as a bailout option.

Cave 1 Divers require a minimum of 140ft3 of bailout, while a Cave 2 level Diver requires a minimum volume of 225ft3.

This means that the average CCR Diver doing a cave dive with an aluminum 40 or a pair of 40’s isn’t carrying enough bailout in the event of a full failure of the unit where they’d be required to swim their bailout from the deepest point in the cave.

Even an AL80, AL40 and the 3L tanks aren’t generally enough for a cave 2 level dive, 2 80’s and bailout in fact aren’t either as that + the 3L cylinders is only 200ft3 of gas.

A recreational diver doing No Stop Diving can use a single AL40 from 40msw/130fsw.

A Technical Level 1 Diver 50msw/150fsw would require an AL80 and an AL40 to ensure they can hit the obligated deco stops ascending from max depth to first deco stops and in the second bottle should have at least a 50% nitrox mix to breath.

A Trimix 1 Diver (2 deco bottles in Open Circuit) generally certified to 60-72msw/200′-240′ should have at least 1 AL80 worth of bottom gas to ascent from max depth to first deco stops. A second AL80 to ascend form the 150-70′ range and then enough gas to get from 70′ to the surface.

A Trimix 2 Diver diving beyond 70msw/240fsw requires enough bailout to ascend from max depth to first deco stop, and then each additional phase of decompression.

A 91msw/300fsw would require roughly 150ft3 of open circuit bailout to the first required deco stop, which would be a trimix of a 21/35 or 23/25.  That would have to last the OC Diver up to the next required deco phase which should be 70′ and 50% Nitrox or a hyperopic trimix like 50/25, while others may opt for a 30/30 trimix breathed up to 20′ which would require yet another AL80 for the decompression phase.

You’ll start to see why the little 3L tanks aren’t enough for deeper trimix dives unless you split the bailout cylinders with your team member(s) to minimize what you’d have to carry.

For “Light” recreational dives, double Aluminum 40’s are a wonderful option offering 80 ft3 of bailout on the back.

SCR Rebreather
Try and Discover Rebreather Experience Today

A pair of Faber LP50’s filled “Florida Style” with a bottom trimix is more preferred for experienced rebreather divers.

For the Same Dive the LP50’s would bring the diver into the 55msw/180fsw range easily, switching to the 21/35, then up to the next deco phase at either 21msw/70fsw or 30msw/100′ and up to the 9m/20fsw phase where another AL80 of oxygen would be required.

It’s so important to plan ahead and plan for the worst, as you don’t want to be left with any surprises, and while a flooded rebreather or a total loss of your PO2 monitoring equipment is rare, which can happen, as can regulator failures, burst disc ruptures and more, but that’s why they call them a failure.  They’re unplanned.

Being Proficient in at minimum of 2 AL80 Stages is why I always encourage Divers to get to at least the Cave 2 or Trimix 1 level.

Maintenance

The pre-dive setup and post dive teardown of a rebreather could take far longer than the planned dive. Some units are easier to assemble and teardown than others, which should be a consideration.

Maintenance, pre-diving evaluation of all components which should be frequently inspected, as well as changing of the oxygen sensors every 6-12 months, servicing the regulators, fittings, o-rings, injection equipment should all be factored in.

If a leak is detected in the unit, it can cause more problems in the event of an emergency, as a flooded rebreather can have an unfavourable effect if the scrubber becomes wet, causing a “caustic cocktail” which can be an instant retching action that can cause the diver to go into a choking reflex as you ingest this corrosive, alkaline cocktail.  If a Diver tries to bail out to open circuit on a separate regulator they may involuntarily inhale more water, while simultaneously retching and possibly drown, this is where a Bail Out Valve or BOV is a very smart piece of equipment.  The BOV has a switch on the rebreather that allows you to open the breathing loop from closed circuit to an open circuit regulator.

The diver will then be able to breath or barf and breath through the second stage as they take sanity breaths for a couple of minutes.  Students are taught to purge empty the rebreather from water on their CCR Course.

Instead of a BOV, some rebreather divers use a DSV (Dive Surface Valve) to allow them to breath surface air topside.  This could be more risky in a caustic environment as the diver doesn’t have the ability to switch off closed circuit to open circuit in the even of a caustic cocktail, so utilizing a necklace under the chin reminiscent of how modern divers dive with a long hose/short hose configuration is the only reasonable option to get breathable gas if the unit is flooded.

People love the “Cool Factor”, but I wholeheartedly caution those who don’t cut it at the recreational or entry-level technical diving level to wake up and seriously ask yourself if you’re ready for all that CCR Diving entails.

A friend of ours who passed away recently ago used to say he never dove a rebreather because he had friends who were Doctors or Lawyers with more letters that were in front of their names who died on them.

Diving a Rebreather is more commonplace now, but unless the dives are super deep (below 150’ or more) or super long like those maybe a Marine Research Diver would be participating in, the reality is that diving Open Circuit is the more efficient choice for the average person.

Rebreathers require a much higher degree of attention, diligence and understanding of how the unit works.  The simpler the unit, the easier it may be to fix on the fly in the event of an equipment related issue.  You should always have multiple ways to receive breathable gas in an emergency, so always do your positive and negative checks, and test out the mushroom valves, regulators, fittings and practice drills regularly to keep your problem solving skills sharp.

Have a well stocked rebreather Save a Dive Kit of spare o-rings, regulator parts, breathing hoses and sensor(s).

Keeping Your Rebreather in “Dive Ready Condition” is a Must.

Pre-Dive Checks, Calibrating the Instruments, verifying flow rates (if applicable), packing your scrubber, then cleaning and disinfecting the unit is all part of rebreather diving.  Don’t be lazy and don’t be complacent.

Diving a Rebreather requires diligence and being familiar with all the inner workings of the unit.

Things to Consider.

Which Side does the oxygen inject in from?  Before or after the gas is analyzed? Does it have an ADV or a T-Block Piece?  How many different ways can you get breathable gas if you need it?  How does the unit breath flooded? Is the unit reliable?  Does it work in cold water or just warm water?  Is it lightweight for travel? Do you need to wear weights with it and how much?  Is the cost of the unit agreeable?

What are the entry requirements to training on a Rebreather?  Agencies who make it “too easy” don’t get the big picture.  Train harder, skill up and then go to a rebreather.  Don’t Take Short cuts.  See my previous blog post What’s The Hurry, What’s The Rush?.

You’re making a decision that can cost you over $10’000.00USD.  Do Your Research, but more importantly talk Us.  We do get Demo Units as well sometimes as trade-in’s.  We currently have a Sentinel CCR up for grabs.

Book a Try Dive with Us and see why our way is the best way.

All too often Divers go blindly into purchasing a rebreather and it’s not until they start putting the hours on their units do they realize they purchased the wrong one.

In Closing

Rebreathers are a lot of fun, as you can extend your dive times, see more creatures up close and more personal, it buys you time in an emergency if you’re trapped in a shipwreck or a cave to find an exit in the event of a collapse making them a safer choice for extreme cave diving and the deepest shipwreck diving.

50-100 Trimix Dives will more than pay for the rebreather and the training, so get your hours up in Open Circuit, get proficient with multiple stage bottles and let’s help you become a Rebreather Explorer.

Vertical Diving SeaHorses Sucking it Up

Diving Dry with Doubles

Diving Dry with Doubles
by
Matthew Mandziuk

Diving Dry with Doubles.  Have you ever noticed that the most active divers on the dive site are the one’s who are Diving  Drysuit with Doubles?  Quite often its the same 10-12 divers who sign up for a lot of the same trips and who often prefer diving together with the group.  The reason for that is comfort, with their kit, with the group, with themselves in the water, whereas the other 10-12 guests are a revolving door of divers with a ranged diving background.

In this blog we are going to talk a little about the benefits of diving Diving a Drysuit with Double Tanks.

By the end of this reading you should have a clearer understanding of the partnership between diving with a drysuit and doubles, the benefits of diving with a drysuit and doubles, some of the training offerings with divers in a drysuit and doubles and where diving in a drysuit and doubles can take you.

Why should you start Diving Dry with Doubles? 

At first it sounds a little much, diving a nylon or neoprene full body suit, hood, gloves and then more weight than we even used in a wetsuit?  Drysuit divers wear approximately 6-8lbs minimum in fresh water (more in salt because of the added buoyancy)  more weight than a diver in a single piece 7mm jumpsuit (or about the same weight as they’d wear with an old school farmer John and Jacket).

That added weight can be inconvenient at best.

Where does one put that extra weight?

Most of our DDS Divers utilize a backplate and harness system which promotes better horizontal trim, posture and streamlining , it’s expandable and fully adjustable to accommodate the drysuit much easier than a jacket bcd can and is far more comfortable.

To learn more about backplates in general, please click the hyperlink above.

Divers diving in Canada with a single tank often times use a stainless steel backplate with a weighted single tank adapter, that system has a total negative buoyancy weighting of approximately 10lbs.  Nearly enough to sink anyone in a 7mm wetsuit with 2-3lbs maximum per side additional, however a drysuit diver is going to require an additional 6-8lbs minimum depending on the undergarments they wear.

In an attempt to  promote proper horizontal trim, the diver will want to re-distribute the weight evenly around the body with a maximum of 4-5lbs per hip pocket and up to that much weight on each of the single tank straps for a total of up to approximately 20lbs of weight plus the backplate system = 30lbs. Doesn’t that seem like a little much?

In an attempt to minimize the weight the diver wears, many will go to a single steel tank which can be 2-8lbs negatively buoyant by todays standards diving with a Faber steel cylinder.

A few years ago Worthington cylinders were preferred for their additional negative buoyancy characteristics with the X7-100 and X8-130 being the 2 most popular options.  In Faber the FX100, FX133 and LP85 are our most popular sizes.  Strangely enough the 100’s and 130’s were also the most suitable tanks for doubling up for deeper dives.

Faber FX100 swings from -8.41lbs full to -0.59lbs empty.
Faber FX133 swings from -9.08 full to +1.45lbs empty
Faber DVB85 swings from -3.8 full to + 2.32 empty

Worthington X7-100 had a swing of -10lbs to -2.5lbs
Worthington X8-130 had a swing of -11.7 to -2lbs

Having a tank that is negatively buoyant allows divers to reduce overall weight required and keeps some of that negative buoyancy behind you which helps improve your trim rather than having all that weight on the hips, but you don’t want to overweight yourself with tanks too heavy and underwear too thin.  Try and find the balance.  Many divers will even favour aluminum tanks for shallow shore diving with thin garments.

Adding an extra tank minimizes or eliminates the need for additional weight while adding a safer configuration that builds on our progressive single tank system utilizing a long hose/short hose and spg on 24″-26″ HP hose and it gives divers  the ability to solve a catastrophic failure thanks to redundant regulators.

Aluminum twins are popular option for divers looking for a great wetsuit set that can be used with a drysuit, however, they are more suitable for use on shallow dives.  When worn with a drysuit the diver will have to wear a heavier steel plate, a v-weight with lead down the centre of the tanks and a compact and streamlined wing.  They are easy to dive with little learning curve.

Steel tanks will take the diver further through deeper dives, caves, wreck penetration and offer more reserve gas on the divers back to deal with emergencies.

Vertical Divers with all the weight on the waist in a jacket bcd with dangling everything
DDS Diver John displaying perfection with great trim, buoyancy, control and style as he swims around the Tugs in Tobermory, ON

Many divers prefer the additional gas capacity of the steel tanks as well as the larger sized tanks allow divers to dive deeper and stay longer in comparison to the standard aluminum 80 tank which is still the most popular scuba diving tank on the market.


Drysuit Divers and DDS Divers have better trim because a drysuit surrounds the entire body with a little bit of air (less is better).

Redistribute weight, minimize weight and enjoy easier diving.


As divers tend to dive more off the dive boats and spend more time on their favourite dive sites, divers start looking at how to get more bottom time.

Diving Nitrox allows divers to gain up to 50% more bottom time on sites around 100′ and deeper, while yielding even more bottom time shallower, however, the limiting factor at that point tends to be their breathing rates and the sizes of tank they use, so a steel tank will in fact increase their bottom time an allow them to achieve their dive plans up to the Nitrox NDL most dives.

For divers who find even on Nitrox, the NDL isn’t always long enough, extending their range into decompression diving often is the trick, as a diver learns how to properly and safely plan their dives with a little bit of decompression utilizing advanced nitrox mixes to accelerate decompression times.  This is where doubles are most beneficial.

DDS Divers practicing bottle handling

When a diver combines the drysuit for maximum exposure protection and comfort along with a set of twin tanks, they no longer have to worry about switching out their tanks on that rocking dive boat in between dives, they no longer have to worry about adding weight to their hips or anywhere usually on their body, and they can certainly benefit from the increased balance and comfort that doubles offer.

You’ll also find divers enjoy just going out and working on foundational skills is easy to observe as our divers are always out in open water honing their skills.

Diving Dry with Doubles allows for more even balance in the water as the tanks are placed over top of each lung rater than down the spine like a single tank, while giving the diver a more comfortable suit to don and doff.

Drysuits are easier to put on than a 5-7mm wetsuit.

Drysuits are more effective for warmth retention.

Crushed neoprene or trilaminate Drysuits don’t compress with depth like wetsuits which get thinner with each atmosphere making the diver heavier because of the initial weight they start the dive with, as well as making the diver colder because those thick suits become much thinner every 30ft/10meters they descend.

Are Doubles For You?

If you can carry them on your back, reach your valves and dive with them comfortably, the answer is yes!


Look at the number of  accidents that have happened in recreational diving situations with single tanks, especially on deeper dives.  Most recreational diving accidents occur in a single tank with no redundancy (pony bottle, sidemount, h-valve, doubles) or lack of training.

A diver breaths their tank empty, their buddy runs out of air and they didn’t reserve enough gas for them and their buddy to ascend, they went in cold water and the regulator froze up, they hit the regulator or tank valve off a shipwreck or overhead environment creating a catastrophic failure, the BCD freezes, their dive computer blows off the end of their high pressure hose (another reason to wrist mount your computer) so they panic seeing bubbles streaming out of the high pressure hose, etc….

Minimize the risk, Increase the Fun and Learning and be more mentally and physically prepared with more advanced training.

If you’re interested in diving deeper than 80′, cavern or cave diving, technical diving, ice diving, mixed gas diving or wreck penetration, you should do it on doubles.  To many people did it wrong and it cost them their lives.

Be the best diver you can be.  Get involved with DDS and we’ll make you the best diver you can be with our training, experience dives, trips, charters and exploration offerings.

We’ve found these factors to be some of the most beneficial tools to extend your diving into a more fun and exciting world:

Dive Planning: Plan Your Dive, Follow Your Plan, Have an overplan, bailout plan, but don’t deviate from the main dive plan

Gas Management: 1/3 down and around, 1/3 back, exiting water with 1/3 of your gas supply 

Redundancy: Doubles allow the ability to shut down your regulator in the event of a failure, free flow, freeze-up, burst disc failure etc. Isolation manifold allows to shut down and switch over by isolating and shutting down the offending post or just shutting down the offending post.

Narcosis Management: Don’t Dive Deep On Air.  You’re narc’d at 130ft/40meters whether you know it or not.  Don’t dive deep on air, it’s silly, outdated and unsafe with education and helium training available now.

Team Diving: Serious Diving requires divers you can trust in an emergency and in an pinch. Don’t just dive with the randoms you find on a boat down south, they’re usually once a year divers with horrible habits and inferior training.  Dive with divers you have a positive history with or as ask us and we can refer you to more progressively minded shops

No Solo Diving on Deep Dives: Solo Diving is popular now, we’d likely choose this option if diving south with random divers instead of having to buddy up with people that we don’t feel comfortable diving with, however, deeper dives require piece of mind, extra equipment and a proper plan with lots of “what-if’s” to be safe guarded against.  It’s not worth solo cave, solo deep (exceeding NDL) or solo overhead environment without buddies

Analyze Your Mixes: Always, Always, Always analyze your mixes when you pick your tanks up, make sure they’re labelled and if diving with a fill that was “just filled” and you have to grab and go, analyze it again before your day of diving begins.

Practice , Practice, Practice: Complacency Kills.  Work on trim, buoyancy, bottle handling, dealing with simulated emergencies, smb deployment, alternate fin kicks, etc.  Be the most polished and best diver you can be.

Fit is Everything

Don’t just jump into drysuits and doubles blindly.  It requires the right fitting suit and undergarments first and foremost.  Many brands of drysuits are inferior in fit and quality, even the brands offering “custom fit”.

You’ll notice most shops try and pedal the cheaper suits that are like garbage bags or garbage bags wrapped in lycra to cover up the garbage bag look. This is like buying a drysuit from McDonald’s!  Don’t Waste Your Money

If you truly want to LOVE your drysuit and want to enjoy using it, take the time to get properly measured and properly fit.  Don’t just let the dive store hand you a suit off the rack and tell you that it’ll fit you perfectly, we’ve had that happen to several students from out of town that couldn’t complete their required skills during Intro to Tech Training and ended up renting suits from us to finish the class, then ultimately buy a brand new suit from us.

Do it Right.

We are partial to Diving Unlimited International because they offer the best quality, service, workmanship and there is an actual after sales service with them.  They are our top choice for hard to fit people too.  It’s all about comfort and fit with them.

DUI have great value priced suits with their Coronado, San Diego and Yukon II suits and the new Cortez (2019) suits obliterate most brands “top of the line suit” for quality, features, performance, as well as coming with user replaceable quick change ZipSeals, meaning you don’t have to send the suits away for service unless you damage the suit or zipper!  No brand can compete with that!

Santi offers a great quality and great looking suit.  We do their stock and modified stock suits.  You’re allowed up to 4 alterations at no extra cost with them and they do offer custom too.  Suits are very tough and stylish with a beautiful Euro look of elegance and colour.  They do take some time 2-3 months typically (sometimes less sometimes more).

Fourth Element offers the most flexible drysuit on the market.  It’s durable and looks great and they’re using technology to their advantage instead of dive stores who can miss measure someone by using BIOMAP technology to digitally create an image of the person to cut the suit for.  Great suits for a great price with great service…it might just take a bit more time to get the suits made 2-3 months typically.

BARE offers a great stock suit at a good price depending on what you get with the suit from your LDS.  Just but it from DDS and you’ll be happiest.

The Drysuit Underwear is as important for fit and mobility as the drysuit itself.  Santi offers modified stock and custom underwear, DUI offers DuoTherm ultra stretch polartec suits for custom fit as well as a great selection of stock sizes in up to an XM450 material which is exceptional underwear for cold water.  Fourth Element offers an amazing range of suits for a range of conditions made with some of the nicest feeling and fitting materials.

Learn more about diving doubles by stopping in or sign up for a Discover Doubles NTEC night with us.  

NTEC will introduce you to the doubles configuration, foundational skills you should master, emergency drills and more. It’s a perfect prep-workshop that introduces divers to the principles that will help lay the groundwork moving forward towards more regimented training with the right guidance, education, exercises and more to help ready you for our NAUI Intro Class.

Our NAUI Intro to Tech Course is a Rudimentary Elements of Diving Course that will highlight the foundational skills and develop them from a recreational perspective that will dovetail into more advanced and technical diving activities and show recreational divers a preview of what their diving can be like by testing and honing a divers finesse, comfort, trim, buoyancy, effortless skills, problem identification and reactions, team diving, smb deployments, buoyancy refinement, fin techniques and so much more.

2 divers swimming across an old wooden shipwreck
Tiller Wreck, Port Dalhousie

NTEC and Intro are the 2 most exciting, modern, challenging classes that will help improve your skills and enjoyment in the drysuit the most. Tie in NTEC and your PADI Drysuit Specialty Course together and see diving with a  different mindset than what you’d hear/see/learn in a traditional PADI system of diving education.

Diving Dry allows for longer bottom time in cooler water or more dives per day. A more comfortable gear up experience from a boat.

When you look at our DDS dive trip pics on Facebook or Instagram you’ll notice aside from a pool or an open water course weekend, the majority of the divers you see on our trips and con-ed classes are all in drysuits and you’ll notice that a lot of the same divers come out year after year on our charters and trips because their level of enjoyment is substantially higher than a wetsuit divers.

A friend of ours had a shop in Massachusetts and they trained their divers exclusively in drysuits.  They offered by far the most expensive open water course from NY-Maine and everywhere in between, yet their continuing education rates were 400% vs a national industry average of about 25% of divers who go diving and train after open waters.

So they found enormous success training their divers and promoting colder water diving trips because like DDS, they realized the best diving in the world was around the Great Lakes, Atlantic wrecks, Florida and surrounding areas. They were right.

In Closing

Drysuits will last you longer than a wetsuit, will give a diver buoyancy control that is easier to maintain when you where a little “squeeze” on the suit vs a wetsuit which compresses and changes depth the deeper or shallower you go.

Drysuits will allow for colder water immersion and more dives per day, while in between dives the divers will warm up faster, so the energy that is rejuvenated is much higher, especially with todays’ warmer Thinsulate’s and heated systems.

Combining a drysuit with a set of doubles sets a diver up for a lifetime hobby where anything is achievable.

The divers can spend more time under the water enjoying their hobby.  They don’t have to change tanks awkwardly on the boat in between dives like single tank divers do.  They add a larger gas source to deal with emergencies such as low on air or an equipment failure, while also adding redundancy in the event of a regulator or valve failure.

Aside from a little extra weight on land, there isn’t much difference between a single tank and a lot of lead to sink a recreational diver and a set of doubles.

For divers who can’t wear a set of doubles, try Sidemount!  Sidemount is a great option for divers who don’t have the ability to reach back to shut a valve down or who have had back surgery or a physical limitation that negates the ability the wear doubles on their back.

At Dan’s we believe in a more fun progression, so training our divers the right way from the very beginning is so imperative and gives them so many more options moving forward beyond Open Water, Advanced, Drysuit, Rescue, Divemaster and Instructor.  Don’t get caught in the boring progressions that the recreational agencies endorse, there is a much more fun, challenging and enjoyable progression ahead.

Experience more in the world of scuba diving instruction with Dan’s and let us show you a better way to do things that makes more sense and creates better divers.

Dan’s is an innovator of progressive recreational and technical diving, bringing the most modern skills and philosophies forwards before anyone in Canada as we continue to lead and offer the highest standards and most exceptional dive training for recreational and technical diving and have helped shaped some of the finest explorers in the world of scuba diving too.  Train with Dan’s and see a brighter diving future.

Unmasked A Modern Look at Scuba And Snorkel Masks

Unmasked A Modern Look at Scuba Masks And Snorkel Masks

Today we’re going to talk about Scuba and Snorkel Masks, which also hold true for FreeDiving applications.

Many Divers and Snorkels ask us “What’s the Best Scuba Mask?” Our answer is simple….The one that fits you best. Read on and learn the additional features that will make your dive mask the best.

Question For You:

Have you ever been to a resort where someone just hands you a snorkel mask our a dive mask out of a bucket and tells you to go and enjoy the water?  For some that can be a wonderful eye popping experience and for others it can be painful, irritating, uncomfortable or downright unnerving.

Today we are going to discuss some of the key features, technologies, materials, styles and levels of comfort you can come to expect from a good quality scuba or snorkel mask.

Hopefully this will help you pick out the best scuba mask or snorkel mask for your every day water related activities.

Key Features

Some would argue that the more expensive the mask is, the better it will fit you or the better quality it is.  This isn’t quite the case.

The best mask on the market is the mask that fits your face first and foremost.

Factors that affect the fit of the mask are face shapes, facial hair, buckle or strap design, single or double lens, type of mask skirt material, lens glass and frame shape to name a few.

Generally speaking the bigger the face the larger the mask skirt and frame will have to be.  Someone with a narrow face like a woman or small child can fit a small to mid size frame, while most average size faces would benefit from a standard fit, larger faces may require a wide fitting mask.

There are a handful of brands who offer small/medium fitted masks, as well as wide fitting masks, while the norm is to make a mask for the average face.

Once you’ve determined the size of mask you may need its time to weigh options, for example, if you have facial hair, you may favour a stiffer mask skirt with a frameless designed that will sit slightly higher above the moustache versus one that lays across the hair preventing a full seal against the upper lip and under the nose.

The Moustache: Moustache divers or snorkelers can be one of the more challenging people to fit, so we often gravitate to a few good “moustache masks”.  These masks are shorter and stiffer in the upper lip area and aren’t as affected by the facial hair which can break the seal of a softer skirted mask.

The BARE Frameless Mask, Atomic Frameless Mask, Mares X-Vision standard and TUSA Powerview have been some of our most successful options.

Avoid The Dreaded Purge Valve!  Rather than going for a proper fit, some people choose to go for a mask with a purge valve in the nose that allows you to simply blow out to evacuate water, which is great, when they work, however, we believe a purge valve mask is an excuse for an ill-fitting mask.

Purge masks also tend to fail over time having the valve curl or simply falling out causing the mask to fill up with water, so for this reason we simply don’t recommend or endorse the use of purge valves in masks, but are happy to add one into any mask you desire should you want one.

Wearing a Skirt?

Guys and girls both wear skirts when wearing a mask.  So what’s the difference in mask skirts?  Mask skirts can be made of a number of different materials including Rubber, TPR (transparent rubber), PVC, Silite, Silflex, Silter, Silicone, Crystal Silicone, Liquid Silicone, Liquid Crystal Silicone, Gummybear Silicone and more.

Rubber was the most common type of material throughout the infancy of snorkeling and scuba because it was inexpensive, created a seal, was black which helped the person see clearer without glare and refraction of light, but it was not a product that had offered a lot of longevity, however, in the late 1970’s silicone started to become more popular due to the fact that it didn’t break down in the sunlight, was more comfortable and chlorine resistant.

Alternatively TPR, PVC, Silite, Silflex, Silter are all harder skirted alternatives that cost less, are replaced more and are often found in the department stores.  Some manufactures promote a silcone mask/snorkel combo, however, a mask can be class as “silicone” with as little as 5% in the skirt.

You can tell how much silicone is in the mask vs. plastic or other materials by holding the clear skirt up to the light.  If the mask has an opaque colour that looks “clumpy” or more white it isn’t pure silicone.  If the mask skirt has an odour the smells like chemicals, its not pure silicone.

Many of our dive mask brands offer both “sport” quality and “dive” quality. Both can be suitable for snorkeling and in some cases diving too, however, fit and comfort are the 2 most important factors affecting your decision to purchase one over the other.

Pure Silicone mask skirts are still the most comfortable, last the longest, do not break down with repeated saltwater or chlorine immersion and are UV resistant.

Silicone masks can come in skirts that are acid washed to be perfectly transparent or they can be coloured black or other unique colours.  At DDS we prefer black silicone because it offers better vision through the process of eliminating excessive amounts of light which flow in through the normally clear skirt and then cause glare and refraction of light when compared to their black skirted brethren who provide eye and glare protection and less overall strain and eye fatigue.

Clear Skirted Masks Yellow over time.

Black skirted masks also age better maintaining their black colour, whereas clear skirted masks only stay clear for a little while, that is until the uv rays, dirt, sand, rubber and other factors start to cause a yellowing of the skirt and they become opaque over a rather short period of time, meanwhile the black skirted mask is still looking as fresh and good as it did the day it was purchased.

Regardless of the mask you choose it’s all about fit and comfort.  You can read review after review, but the mask should be fitted by a professional who understands your needs, wants and has a good selection.

We sell virtually every brand of mask, but have cherry picked among our entire staff the masks we feel to be the best fitting masks on the market.

Keep the gimmicks to a minimum.

The Fit

Make sure when you’re wearing your mask you can equalize your ears by squeezing your nose pocket, this will ensure you can get to the nose pocket when you need to.

Make sure the mask strap isn’t too tight.  A proper fitting mask only needs to have the strap snug, not tight because the water pressure is going to keep the mask on your face for the most part too.

Make sure the mask doesn’t sit against the brow area putting pressure on it if its a 2 lens mask (men generally have a protruding brow).

Make sure the nose pocket doesn’t dig into the bridge of the nose.

Wear the mask strap just over top of the ears centering it around the middle 1/3 of the skull.  Wearing it too high can cause the mask to push up under the nose causing chaffing and making it raw over time, so really pay attention to centering it and keeping it adjusted comfortably.

When wearing the mask you can check for proper width by looking in a mirror.  You don’t want to see the skirt too narrow that it sits on the eye, but you also don’t want it so wide that it lets water in through the top or sides.

Breath in through your nose without using the strap, see that the mask sits comfortably on the face.  If it does, put the strap on, snug it up comfortably and with the mask against the face exhale.  The exhaled air should go out the bottom of the mask not the top of the head by the temples or above the eyes.

High or Low Volume?  Which is Better?

Low Volume is always best.  The lenses sit closer to your eyes.  There’s a smaller airspace to equalize the masks internal airspace which is something you’ll notice when you go down on breath hold or on scuba.  With increased pressure the mask will suck to your face more and more and more eventually causing pain and discomfort.  To avoid this you’ll need to equalize the airspace by simply blowing some air through your nose into the mask to keep it from squeezing down.

tusa_panthes_mask_for_sale_online_in_canada
Black Skirted Masks maintain their colour and help eliminate light glare

Lower volume masks are more comfortable and are easier to clear water out of as well.  Imagine a big round window shaped mask and how big and how much water can fill that mask up.  Now picture a streamlined mask that has a similar surface area to that of a pair of swim goggles but with an enclosed nose so you can blow into it.

Which mask is going to be easier to clear the water out of ?  The one with more or less water in it?  If you guessed less water in it you’re right.  The smaller the masks overall internal volume the easier its going to be to blow the air out of it.

Frame or No Frame?

Divers have long gravitated towards plastic framed masks that press the glass, plastic and frame all into one package with a lens retainer.  They’re durable, comfortable, most popular.

Frameless masks are a more modern concept that has less overall parts and simplified construction by simply moulding the silicone frame over the tempered glass lenses and bonding the silicone to the skirt.

The Different Mask Lenses

The market for different dive lenses have changed a lot since the initial introduction of simple tempered glass or polycarbonate lenses.

Tempered Glass lenses are still the industry standard because of their durability, relative cost effectiveness and the fact that they don’t shatter inwards due to pressure.  They can break like anything else, but generally the glass will stay together.

Tempered Glass is durable, they aren’t affected by scratches in the water, but they do have a greenish tinge to the glass which cuts back on light transmission.

Polycarbonate is plastic, scratches very easily and not suitable for scuba diving or much more than pool playing.  They’re typical of your department store masks which are cheap and not designed to last.

Ultraclear Glass Lenses introduced by Atomic Aquatics

Ultraclear glass is an optical quality glass with exceptional clarity and high light transmission, with no colour distortion.

Standard float glass (tempered glass) lets through approximately 86% of the available light but UltraClear lenses can allow up to 92% light transmittance. Combine that with the increased colour vibrancy and clarity and you’ll never want to dive with a standard lens again.

ARC Lenses or Anti Reflective Coating Lenses Introduced by Atomic Aquatics

Between 4-14% of light can be reflected back or “lost” by the standard “green float glass” mask lenses used by the more traditional mask makers.  ARC technology lenses are especially important for SCUBA divers underwater, where available light is quickly absorbed by the surrounding water because they help amplify available light.

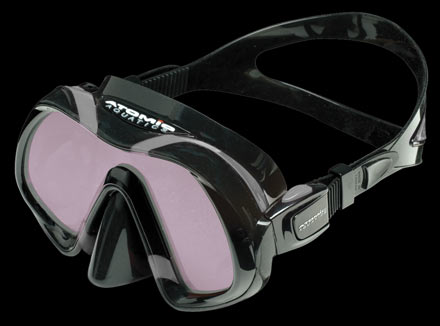
Atomic Aquatics ARC Technology to reduce reflected light and actually increase the amount of available light transmitted to a diver’s eyes. The result is a greatly improved transmission of 98% of available light, compared to a loss of more than 14% of light with standard green “float” glass used on the majority of masks on the market.

ARC uses a multi-layer metal oxide coating process applied to both sides of the UltraClear lenses. This allows more light to enter the mask by reducing light reflections off the inside and outside surface of the lens. The metal oxide coating is only a few microns thick.

Anti-Reflective Coatings or ARC is a multi-layer metal oxide coating process applied to both sides of the Ultraclear lenses. This allows more light to enter the mask by reducing light reflection off the inside and outside surface of the lends. Clearer, crisper vision.  Reduces eyestrain, glare and prevents ghost images on the viewing area of the lens. A must for night diving and limited visibility conditions and underwater photographers.


Mirrored Lenses

Some Divers like the idea of mirrored lenses, however, they reflect back at the fishlife and can cause unwanted confrontations.  They also hide the divers eyes, which are essential when assessing diver comfort underwater, so for this reason we’d suggest staying away from mirrored lenses.

Types of Mask Straps

DDS Neoprene Mask StrapMost mask straps are made of the same material as the mask.  They’re designed to fit comfortably, not overly tight around the back of the wearers head and have side adjusters that allow you to often times pull the mask strap by tabs to tighten it.

The straps can pull hair or can tend to be uncomfortable.  One way we fix this is by adding a neoprene mask strap backing or replacing the entire strap with a neoprene adjust-a-strap which uses Velcro on the sides and neoprene on the back of the head.

You don’t need hair to enjoy a neoprene mask strap, they’re the best option for ease of donning or taking your mask off, plus they also float a little bit, so if you drop you mask into the water you may have faster response as it may not sink immediately .

Prescription Lenses

We can get a number of masks with prescription lenses.  We carry lenses in + or – diopters, as well as custom ground lenses for people needing lenses for different pupil distances and special features.

The costs of lenses for negative diopters are very reasonable.  Positive diopters are more expensive.  Standard bio-focal lenses are also available.

We generally recommend TUSA or Atomic for prescription lenses.  They’re easy to install and the masks are the best quality you can buy.

Replacement Parts

When purchasing a mask consider the fact that this product will last you 20-30 years if you look after it.  My personal TUSA mask is one I’ve had since 1996.  Dan had a 30 year old TUSA mask.  When you buy quality products from reputable manufacturers who make their own masks (NOT OEM with a Log slapped on) you purchase a product that is going to have parts and service around for years (or decades) to come.

Mask clips can commonly break if dropped or stepped on.  Lenses can chip, mask skirt scan rip, lens retainer clips can break if you’re cleaning the mask and mask skirt on a regular basis.

Brands like TUSA, Atomic Aquatics, Mares Diving, Problue and Scubapro keep a range of clips and replacement parts in stock.

Pre-cleaning Your Mask

Pre-clean your mask with toothpaste rubbed on the inside of the glass and take a toothbrush with mild abrasive and brush the inside glass to remove a protective silicone residue that is tacked on the inside.  You can also carefully burn it off with a flame if you have a steady hand and trust yourself around silicone.

Pre-cleaning the mask will help prevent fogging and will give you a better chance of fog-free diving.

Defogging Your Mask

Mask defog is your friend.  Not because we’re a dive store, but because you don’t want bacteria ridden saliva in your mask that you may or may not fully rinse out.  We’ve seen divers with eye infections from using the communal “spit bucket” on the dive boats down south where 10-20 divers are all spitting in their mask and then rinsing in a communal bucket.

Commercial Mask Defog is awesome!  It lasts years and years despite the small affordable 2oz bottle it comes in.  McNett Sea Drops and McNett Sea Gold are the best defogs we’ve used.  No bacteria or eye irritation and you also don’t have as much black mould or bacteria growing in your mask after 6-12 months of using it vs. spit.

Spitting in your mask is a good temporary solution, but defog will prevent things from growing in the mask and give you the best fog free solution.

To use your defog properly though follow these steps.

  1. Apply defog to mask lens dry 2-3 drops per lens or 5-6 drops overall if single lens max.
  2. Leave defog on the mask until you’re ready to hit the water
  3. Rinse defog off with your finger and water
  4. Put mask directly on your face or keep filled with water until ready to wear
  5. Keep mask on face, do not take off and let it air dry
  6. If taking mask off fill it up with water and leave lenses wet, don’t air dry

Maintenance For Your Mask

Your mask over time may get dirty, mildewed or saturated with salt crystals or sand which can get between the lenses.  Every 1-2 years or sooner, you should consider taking your mask apart and with hot water, some dish soap and a toothbrush, gently rinse and scrub every bit of the mask frame, skirt, lenses, and lens retainer clips (This isn’t possible with Frameless masks which do not come apart).

To learn more about care and maintenance of your scuba and snorkeling gear take our PADI Equipment Specialist Course.

In Closing,

The best mask on the market is the mask that makes you feel like its a part of your face, it fits naturally, it doesn’t hit off the brow, press on the bridge of the nose and doesn’t need to be overtightened.  It can come with a range of different lenses and price points, but at the end of the day its the mask that feels the best and has the features you want that’s the right one.

While technologies change, the fit criteria should all the same.  Comfort, ease of adjustment, ease of clearing because its low volume and it should look quasi-stylin’.

Matt Mandziuk
Recreational, Cave & Technical Diving Instructor
NAUI Cave & Trimix Instructor 45416
TDI Trimix Instructor 4767
PADI MSDT 207233
SDI Instructor 4767
IDREO Rebreather Instuctor (CCR)
Owner
Dan’s Dive Shop, Inc.
www.dansdiveshop.ca
matt@dansdiveshop.ca

Diving a Backplate The Best Option for New Recreational Divers – They Don’t Tip You Facedown

Diving a Backplate The Best Option for New Recreational Divers – They Don’t Tip You Facedown
by
Matthew Mandziuk

There is a common misconception in the world of scuba diving that backplates  and wings can push a diver facedown on the surface.  Those people are wrong. Diving a Backplate is the Best Option for New Recreational Divers and unlike the majority of brands with front loaded weight pockets, most recreational jackets with back buoyancy WILL tip you face forward, a backplate will not.

In this blog we will outline with real life experience and even some fun video evidence how a properly setup and weighted backplate does not push you facedown, but in actuality it is the most comfortable, efficient,  streamlined and safest buoyancy system available.

Misconceptions

Halcyon_infinity_bcd_for_sale_online_dans_dive_shop
Backplates keep things simple and streamlined above and below the water.

The false mindset that backplates tip you forward on the surface  has ultimately come from divers who were using an improperly balanced back floatation bc with a horseshoe wing shaped bladder that was wider/thicker on the bottom of the wing and narrower/thinner in shape closer to the top. Other causes could be that there are high capacity integrated weight pockets located horizontally across the waist area of the bcd causing the force of gravity to shift.  This is why we opt for a vertical pocket that sits back towards the hip area. Or they just plain have never tried it.

A back floatation bcd with an improperly shaped wing design as described above coupled with front loading weight pockets that put the weight pocket closer to the front of the body laying the pockets from the middle of the body to front of the body rather than how they should be oriented, which is from the back of the hip moving from the middle of the body to the back of the body towards the backplate can create a very troublesome scenario with respect to body orientation and tipping.  As a matter of fact, some jacket bcd’s will even push you facedown.

Halcyon Active Control Ballast positions weight from the hips backwards towards the plate, which helps sit the diver vertical on the surface
Halcyon Active Control Ballast positions weight from the hips back towards the plate, which helps sit the diver vertically on the surface

A backplate doesn’t generally have this problem because it is a more balanced rig offering a wing that generally allows for even air distribution around the bladder like a circle or a doughnut that allows the air to move unrestricted and doesn’t trap air. Some units even offer a weighted single tank adapter with up to 6lbs/2.2kg of lead placed inside the STA with little to no weight needed with even the thickest wetsuit in salt water.

Divers may experience a tipping sensation on the surface from any bcd due to the action of over inflating the wing or a jacket bcd, however on a backplate and wing style system like a Halcyon Infinity MC System you don’t generally have this issue as shown in the video below.

Join the Zero Weight Club

There's nothing more freeing than enjoying your backplate on a DDS dive trip to Mexico
There’s nothing more freeing than enjoying your backplate on a DDS dive trip to Mexico

Ideally You’ll want to get to a point where you aren’t wearing much/any weight with a wetsuit and have a balanced enough setup that you can simply just swim your gear up without having to kick hard to get there.  The more weight you have on the surface, could pull you facedown if the weight pockets are in the front of your harness and the wing is overinflated.

Explore shipwrecks with the right gear and comfort
Your Backplate can grow with you from singles to doubles, wet to drysuit, recreational or technical and rebreather diving. 1 bcd for everything.

If you’re using a drysuit you may need a little more weight, but a steel tank is also a suitable option or a set of doubles.  They balance you out even better and for diving locally offer redundancy in the event of a regulator failure.

How do you tell you’re overweighted?  Go up to 10 feet/3 meters with a 1000psi in your tank and see how much air is in your wing.  If you reach back and can feel a substantial amount air try venting the air out while laying horizontally and lifting your rear up, orienting your head slightly downwards to get the air to the highest point and use the back dump to vent the gas.  If you start going down quickly you’re overweighted, but this is another conversation to discuss in another blog post.  You should basically have no air in the wing and be able to hold a stop at 1000psi in an aluminum 80 at 10-15′.

To This
Hovering horizontally motionless underwater enjoying total diving freedom. No bulk, No clutter, No discomfort

The Unsung Hero

Backplates are the most streamlined, balanced, and versatile diving system for recreational divers, cave divers, technical divers and rebreather divers, offering you ONE uniformed diving system that grows with you throughout your diving career, making it the best option for a new scuba diver who doesn’t know where their diving will take them because they won’t outgrow their unit.  It can be dived with any exposure or tank configuration, in any environment, while offering the most streamlined swimming profile and neat and tidy equipment configuration when rigged properly for modern and progressive scuba diving activities.

Backplates allow for better buoyancy distribution and promote body position

A backplate can allow you to minimize bulk and clutter if you keep the harness clean, also streamlining your body if you are utilizing proper trim and posture, which should allow for you as a  scuba diver to maintain horizontal orientation in the water when swimming and when just sitting there hovering horizontally, even on ascent and descent, rather than being pushed or pulled vertical, which is the position a jacket or a bcd with the weights in the front of the harness generally do by pulling your body knees and fins down towards the bottom.

Backplates allow for motionless hovering keeping the diver within 10% midline of horizontal underwater but allowing you to lay perfectly flat and comfortable with head out of the water on the surface.

Simple and Streamlined

Backplates are more robust than a more traditional bcd, which are often ladened with excessive fabric, padding, straps, d-rings and breakable plastic buckles, whereas a Backplate simply has 1 release buckle if rigged properly, which is located just off to the right side of the waist and is right handed release like a weight belt buckle uses.

Backplates and Wings are available in all different shapes and sizes including regular, short and even tall plate lengths

Clips and Buckles on a jacket bcd can increase task loading and may prolong rescuer response in comparison to a  backplate, as you’ve got a minimum at least 3-4 clips and a cummerbund to free the diver from their gear in a jacket compared to a simple right hand release buckle on the waist followed by pushing the harness free of the divers body.

Since more clips create a delay in freeing the diver in an emergency divers may want to avoid a jacket style bcd with fancy clips, gadgets and clutter in favour of diving more simple and streamlined.

Some backplates offer adjustable cinch harnesses to allow for easier donning and doffing, while not compromising the structural integrity of the harness with breakable plastic clips. To operate the cinch you simply pull the waist straps to tighten shoulders or lift the shoulders up to loosen the harness. There is no sternum strap to compress your chest and inhibit breathing, so you aren’t starved for air on the surface, the backplate thanks to a crotch strap and a proper fit prevents the bcd from riding up on the surface, and there is no chance that the backplate can crush your stomach and ribs like a jacket bcd with a wraparound aircell can when fully inflated.

Progressive Dive Training

Many of our divers are mindblown when they begin their journey into scuba diving and they see the poor job that the vast majority of dive stores and instructors are doing with scuba diving certifications.

Training with a more progressive dive store is a great way to get solid diver training, however, they are few and far between.

10309646_10156720498530512_7638916031124415553_n
Good Trim, Knees Up, Fins away from the reef. This is a great example of Progressive Diving.

At the time of this article Dan’s Dive Shop is the first and only dive store in Canada to be offering entry level training in a backplate system and a long hose/short hose regulator configuration at the Open Water Diver level.

Buoyancy and Trim and the most important skills a diver will learn and as such, those skills, along with air sharing, proper horizontal ascents and horizontal descents are things that need to be perfected.

Perfect Example of what not to do.

Progressive Diving means to have the right skills, abilities, diver and team awareness, safe diving practices and understanding that they need to maintain their skills through practice and repetition on a regular basis.

In some circles this philosophy is known as Hogarthian, DIR, Doing it Right, NTEC and more. In all cases these methods have made diving safer, better and more enjoyable.

Buy it Once

If someone told you you could have 1 BCD to take you from singles to doubles, wet to dry, down south dives and on warm reefs and walls to the most beautiful cold water shipwrecks, cold water reef and walls or ice diving, would you listen?

Take a look on Kijiji or any of those used gear websites and you’ll see something that often states Jacket Bcd used only 6 times or 12 times.  When you talk to the owners a lot of the time you find out they upgraded to a backplate, or they bought a drysuit or a 7mm wetsuit and their original jacket doesn’t fit.

Not only is a backplate the most stable diving system, but it is also built to be the first and last bcd you ever need.

The Proof is in the Pudding

If you have been told that backplates tip you face down please take the time to share this video with the source of this misinformation.  Not all back flotation bcd’s are innocent, some will push you facedown, but a properly shaped wing and proper weight distribution and pocket design will not.

Best Fins For Scuba Diving Review The Real Best Fins and Why

Best Fins For Scuba Diving Review The Real Best Fins and Why
by
Matthew Mandziuk

This Best Fins For Scuba Diving Review The Real Best Fins and Why is a rewrite of a previous fin report I did up a few years ago.  This is a great overview of dive fins, especially for the diver who only wants to buy their fins once and learn about the Best Fins For Scuba Diving.  Learn what most of the Other Dive Stores and Other Brands Brands Won’t Tell You.

When divers are searching for dive fins there is a lot of miss-information, too much choice and too few actual “experts” out there who try all of the different fins in a real world environment using different exposure suits, diving in different environments and with different equipment configurations.

bad_fins
“Aqualung Slingshot Fins are the best fins”. Said NOBODY Ever! Slingshots, Split Fins, Hinge Fins, Seawing Nova Fins, Floaty lightweight plastic fins are a waste of money and lack propulsion

It never ceases to amaze me the things divers put on their feet and attempt to kick underwater with and the amount of energy the exert, the extra air they consume and the additional CO2 they create in the process, not to mention the fact that many dive stores look at the almighty dollar instead of customer satisfaction.

We are at a point in our educational path where we really can’t handle students showing up on referrals or open water courses with the wrong gear.

What makes it the wrong gear you ask?

Inability to perform in the environment that the students are diving in. Inability to propel oneself through the water in an efficient and streamlined manner without stirring up the bottom and inability to maintain proper trim and buoyancy, the ability to move at a reasonable pace without over kicking or over breathing.

Each year we get divers from different dive stores on Open Water “Referral” dives where they often time show up in fullfoot fins (Slip-on fins people wear barefoot) or lightweight, flimsy plastic fins.

Technical 1 Divers doing a Helitrox Dive on Dufferin Wall in Tobermory, Ontario
Technical 1 Divers doing a Helitrox Dive on Dufferin Wall in Tobermory, Ontario great trim and buoyancy with the right fins

The problem with this is the fact that the divers can’t actually maintain proper horizontal trim with these lightweight buoyant fins as they generally speaking have their feet floating up inverting them away from a horizontal position to a vertical foot up head down orientation.

The fins also lack propulsion to actually properly move them through the water.

When a diver kicks what you want is to push the water off the end of the blade of the fin, which is only about the first 13-15% of the blade, while the rest of the fin is designed to be rigid and provide a stable platform for the water to roll down off the end of the blade, so when you put a very lightweight plastic or rubber blade on the end of a foot pocket it just bends and twists and requires side rails to keep the structure of the fin intact.

You need a stiff blade to move more water a soft blade will not displace as much water.

Photographer Fawn Messer photographing Giant Manta Rays in Socorro Mexico

The problem we find with most divers is their inability to kick properly, their inability to stay perfectly still in one spot without moving hands or fins frantically or their lack of awareness.

Many divers use a flutter kick because that was what they were taught in Open Water, but its inefficient and often times they kick from the hip or the knee straight down rolling the knee/ankle and using excessive energy, while silting out the entire dive site kicking silt up as they channel the water down towards the sensitive bottom fanning up silt and sand one leg at a time, or worse, the divers cause serious damage to the reef as they’re bicycle kicking vertically like a rototiller towards the fragile coral.

At Dan’s, we teach our students a different kick, a more efficient kick, well actually a series of kicks.  Modified Flutter Kick, Frog Kick, Helicopter Turns and Back Fining . These kicks allow for greater control and comfort in the water, while offering more finesse and easier mobility in the water, while eliminating the need for people to hand swim, which is inefficient and a terrible open water diver habit that occurs from divers who aren’t maintaining proper trim or balance in the water.

Why don’t we teach flutter kick? 

Most stores teach their diver to flutter kick because that’s what they’ve always done. We don’t recommend using the flutter kick as your main kick because it creates more drag through the water moving 1 fin at a time causing increased air consumption and energy usage, as well as the most logical problem of it channeling the water straight down to the bottom which reeks havoc underwater with the visibility creating massive clouds of silt that resemble a nuclear mushroom cloud.

Inefficient flutter kicking with a flimsy split fin
Inefficient flutter kicking with a flimsy split fin. Do you notice how the divers body rolls from one side to another?

I was in Tobermory one July 11th weekend and I heard an instructor instructing a student that they needed to get their entire leg into it and kick from the hip straight down. All I kept thinking to myself was what does the visibility look like after these 2 have fluttered through the water? Split fins, hinge fins, fins with funky angles, Seawing Nova fins or really flexible materials are not ideal for diving unless you only ever plan on diving a single tank and flutter kicking. Most fin blades over flex and don’t become useful with divers who have good leg strength. I can over power most fins on the market from the gimmick filled brands.

Nothing offers a better, more efficient, more powerful fin kick than the following APPROVED fins for more progressive diving use: Scubapro Jet Fin, the original, tried, tested, true high performance, high efficiency fin. OMS Slipstream Fin a lighter version of the Jet Fin, Hollis F-1 fins, Dive Rite XT Fins plastic fins with exceptional thrust, Mares Quattro a good fin that is longer, but less efficient that the above mentioned fins, Mares Plana Avanti X-3 lighter kick than a quattro, Mares Super Channel stiffer kick than the x-3, Mares Quattro Excel Fins offer the most precision fin techniques of all Mares Fins but the blade is long and they’re less efficient than some of the above mentioned fins. Mares Power Plana (New Rubber composite material) offers good thrust, while the short blade makes it one of the better Mares Fins for more progressive diving, but it is a lighter blade than the Jet or equivalent.  The XS Scuba Power Fin offers similar performance to a Scubapro fin, as well as their XXL and XXXL Turtle Fins which are both jet fin inspired options, Hollis F-2 fin a shorter, lighter fin than the F1 that allows for the standard kicks with less power and propulsion, not recommended for high flow currents/caves/heavy gear.

The above list of fins although relatively short, cover a broad spectrum of options when you figure there are over 100 different fin models on the market from the major brands at the time of this blog post.

What fin technique is better? 

Here at Dan’s we teach “Frog Kick” or “Modified Frog Kick” to our divers as their main propulsion method because it is an effortless way to swim around your favourite dive site.

You Simply Kick….Glide…..Kick…..Glide.  With a good frog kick you can kick and the push you get will allow you glide for several feet afterwards, allowing you to re-load position of your feet and kick again, often times breathing on the gliding portion and exhaling often on the kick.

You’re channeling the water straight behind you in the same direction the fins are moving. In between kicks there is a glide effect as your momentum moves you forward on your rest stroke and continue on from there.

The biggest issue we have with fins is watching divers floundering around with no control. In an effort to try and keep their knees bent while arching their back to keep their fins at the high point for proper trim, they have a serious lack of control because they can’t seem to do anything with these fins. At that point, the hands come out with sculling to try and stabilize, the flutter kicking starts which is usually followed by a silt out.

Floaty Feet

Some plastic fins are positively buoyant, so when you’re in proper position which should be 10 degrees midline of horizontal, they can bring your feet up too high and keep reaching for the sky so to speak, bringing you inverted and to the point where if you don’t correct it to a point where  you turtle flipping and rolling.

A little bit of weight from the fin, not in the form of ankle weights (which will bring you legs down too low) may keep your feet in the perfect position.

I am a big fan of the Scubapro Jet Fin for this reason.  It offers the best quality fin, lifetime guarantee on the fin even against breakage, and gives me a nice stiffness in the blade, while allowing me to dive it with singles, sidemount wetsuit, drysuit, rebreather or doubles and allowing me to maintain perfect trim offsetting my “floaty feet”.

Scubapro Jet Fins available in many different sizes, colours and with or without spring heel straps

So how do you know if you have floaty feet?  Many people male and female who are thicker through the calves/ankles likely have a bit more need for heavier fins, as do drysuit divers who have buoyancy in their thick undergarment socks or a neoprene boot.

dive0
Dive Rite XT Fins with spring heels

If you don’t suffer from Floaty Feet, find that you don’t need a heavier fin, have a look at the Dive Rite XT Fin.  You won’t find a fin on the market that gives you as much speed and performance in a plastic material than the XT Fin.  Its outperformed virtually every fin on the market in real world and simulated testing.

For more on the XT Fins or a good second opinion of fins have a look at the Dive Rite Blog posted by Lamar Hires back in 2007.

Try getting into the water in your normal setup with no fins on and see which way your body floats, most times your head will drop and your feet will go up if you’re using a proper buoyancy control system and are distributing your weights properly (NOT ON YOUR HIPS). Do this with a tank that is at its lowest tank pressure (if you’re diving aluminum 80’s try it at 1000psi).

If you’re finding your feet go up in a balanced rig for singles or doubles, you can add a trim weight, tail weight or you should try adding a rubber fin to the mix.  If you find your feet drop downwards, you have too much weight on the waist, remove and re-distribute and try again.  If you find your feet still sinking something isn’t right and a Rubber Fin will make it worse.

You can really benefit from additional training as well.  Courses like Intro to Tech or a Fundamentals style course can really improve your skills, knowledge and understanding of the concepts of buoyancy.

Fin Buckles

Likely one of the most often overlooked features of fins are the strap and buckle assemblies.  Fins with plastic buckles and plastic buckle posts and inner roller pins often are made of a breakable plastic material and the loose straps can often find their way into an area of entanglement.

Purchasing fins with spring heel straps makes more sense, you have an near unbreakable stainless steel spring and a stainless or delrin post that is pretty well unbreakable too.

The boots you wear whether wet or dry will stay in place as the stainless heel strap will tighten up as the boots compress with pressure from descending to depth and loosen off as the boots expand back to normal size upon going shallower and the neoprene expanding (if diving wet) or the drysuit boots being filled with a little more gas in them.

Worst Fins for Scuba Diving

The Worst fins without really discriminating against all major fin brands is more of an overview; Avoid the majority of overpriced, overly expensive fins that have hinges, splits, are very light weight, offer unfounded claims of propulsion and performance and of course you can ask us.

Stay away from fins that dive stores are classing as “beginner” fins, there shouldn’t be a designation of “Beginner” or “Expert” diver when it comes to gear configuration.  Every scuba diver should be taught to dive the same way, utilizing the more progressive kicks in the more progressive gear and not be limited by their equipment or their training.

My unwritten rule is if the gear is really pretty or has a lot of hype or bells and whistles it’s likely not that good.

A True Story

Once upon a time I was introducing my ex-wife to double tanks, but she had pretty Pearlescent Pink TUSA Tri-Ex fins, which were very buoyant and I told her she should leave behind at the store as I was loaning her my wetsuit Jet Fins.  When we arrived at the dive site, I got her all buddy checked and I entered the water.At the last moment with my back turned she had a second thought and grabbed her horrible pink fins and put them on in the water and we began our dive.

Seven minutes into the dive she aborted the dive because she was tired and out of breath.  I asked her what the problem was? Knowing full well as soon as she fell behind what the problem was and I noted the pink fins.

She called the dive and told me she wasn’t going anywhere in her fins, so i asked the princess what fins she was wearing and she smiled at me innocently and uttered the words “my pretty ones”.  I told her to get out of the water, grab the Jet Fins and get back in, so she did and she loved them.  For 3 years she dove those fins.  You’ll actually notice them in the top right photo in the background with the pink tanks.

The moral of the story was that she noticed right away how inferior her fins were, how despite the look of the old Jet Fins that they outperformed her newer, more sleek looking fins and that when it came to diving, one little modification like getting better fins can make a world of difference and no longer limits your progress forward.

I’ve always been an advocate of simple and streamlined and doing it right for a reason.

We believe in good fins and proper finning techniques

Maybe it’s because we teach our students a different way of diving, but these divers whom we’ve retrained end up having to buy new fins because their fins just didn’t live up to their diving needs at the open water diver level.

An improperly balanced scuba diver wearing the wrong gear using the wrong techniques

We believe in teaching diving the right way and giving you the tools to make a more informed decision when you purchase your equipment and additional dive training. After learning the pros and cons the customer is able to make a more informed decision. We are happy to sell anything we have or can get if people who insist on them, but it doesn’t mean we recommend or endorse the products at that point. Here are a few photos of us teaching proper fin techniques, proper trim and fit and functionality to new open water and advanced divers.

Our methods and training teaches you how to dive right from the beginning, purchasing the best gear and training available. Check out our training section for more information your next diving course.

DDS Diver maintaining proper trim, posture and buoyancy

Please don’t be insulted if you read that your fins are no good. They’re likely good fins for flutter kicking with a single tank on a reef in a shorty wetsuit, but add a drysuit, a large single tank or a set of doubles, a mild current, more weight to offset that wetsuit or drysuit and now you may find your fins don’t cut it anymore.

Diving is about versatility, evolving and personal development of skills is a big part of that. All divers both recreational and technical should know proper frog kick and they should all have fins that will enhance not hinder in water performance.

If you read our blog and like what we’re doing, we’d appreciate your feedback and business as we share the most up to date and modern information available. Come diving with us, train with us and harness your maximum potential.

The Rescue

One a most recent trip ocean diving in Cozumel 2 divers on the trip were equipped in the wrong fins. One a pair of TUSA Split Fins and the other a pair of Sherwood Elite Fins.  Neither were able to swim against the surface current back to the boat and had to be rescued.

So why did this happen?  Simply put, they had the wrong fins!

It doesn’t matter how much cheaper a pair of inferior, lightweight, plastic Sherwood fins are when you have the fear of your life and panic, which is exactly what happened to the diver in these fins.

The other diver, an experienced DDS diver decided to favor weight for travel over performance and thrust and when they were returned safely to the boat, they said they wished they’d brought their Jet Fins and uttered the words, “Never Again”.

Don’t put yourself in harms way, don’t favor your pocket book over your life, do yourself a favor and get the right gear the first time and the best stuff you can.

Your fins are the most important piece of gear you’ll have as a diver.  Don’t make the same mistakes thousands of new divers a week around the world do.

Buy The Best Fins

Dan’s Dive Shop offers the best selection and pricing you’ll find on scuba diving and snorkeling equipment in Canada or the United States, so please, if you feel that this article has helped you and you would like to purchase the best fins, take a browse through our online store and add a set to your shopping cart today.

Thank you for reading this.  If you have any questions about gear, training, diving techniques, please email me.

See you underwater,

Matt Mandziuk
Recreational, Cave & Technical Diving Instructor
NAUI Cave & Trimix Instructor 45416
TDI Trimix Instructor 4767
PADI MSDT 207233
SDI Instructor 4767
Owner
Dan’s Dive Shop, Inc.
www.dansdiveshop.ca
matt@dansdiveshop.ca